Winter Seed Sowing: A Simple Way to Grow a Beautiful Garden While Winter Sleeps
Discover the history of winter sowing, learn how to start seeds outdoors in the cold months, and get a head start on your spring garden with this easy, budget-friendly gardening method.
When the garden beds are resting, the trees are bare, and the days are short, it might seem as though gardening season has come to an end. But winter is actually a wonderful time to begin preparing for spring!
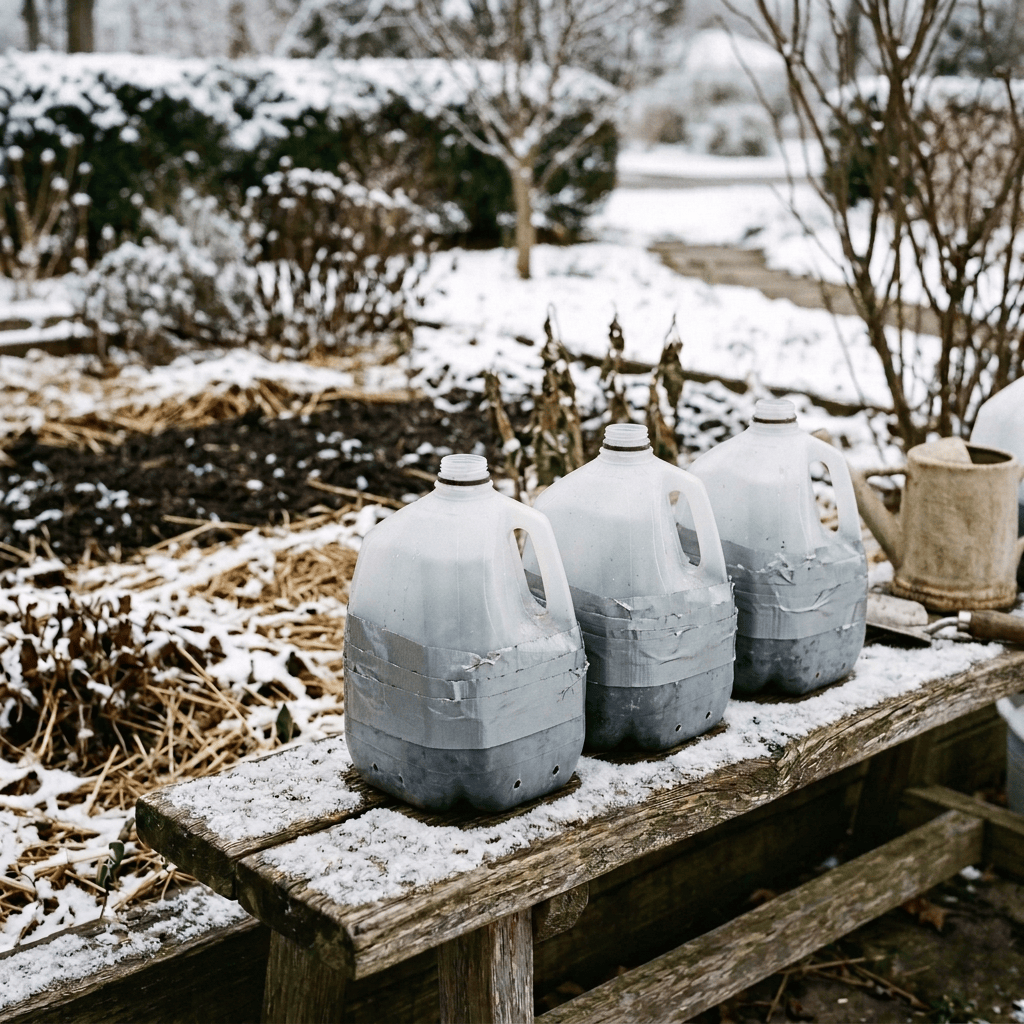
Winter seed sowing is a simple, affordable way to start many flowers, native plants, herbs, and vegetables outdoors during the colder months. Instead of filling your home with seed trays and grow lights, you can use recycled containers to create miniature greenhouses and let nature do much of the work.
Whether you are a seasoned gardener or just beginning your gardening journey, winter sowing is a rewarding way to turn the quiet months of winter into the beginning of a flourishing garden.
A Brief History of Winter Seed Sowing
Nature has been doing it all along
Long before gardeners began using plastic containers, plants relied on the changing seasons to reproduce. Many plants naturally drop their seeds in autumn, allowing them to remain outdoors through winter before sprouting when conditions become favorable in spring.
For certain species, exposure to cold and moisture helps break seed dormancy. This process is known as cold-moist stratification. It prepares seeds to germinate at the appropriate time rather than sprouting prematurely during an unfavorable season.
Gardeners have long taken advantage of natural seasonal cycles by sowing seeds outdoors in autumn or winter. Modern winter sowing builds on this same principle.
The modern winter sowing movement
The modern method of winter sowing in recycled containers is widely credited to gardener Trudi Davidoff, who developed and popularized the approach in the early 2000s. Her method used clear or translucent plastic containers as small outdoor greenhouses, allowing seeds to experience natural winter conditions while offering some protection from wind, animals, and other environmental challenges.
The idea was wonderfully practical: rather than relying on indoor grow lights, heated rooms, and extensive equipment, gardeners could sow seeds in containers, place them outside, and let seasonal temperatures help regulate germination.
Over time, winter sowing gained popularity among home gardeners, native-plant enthusiasts, and people looking for an economical way to grow more plants.
Today, gardeners commonly use recycled milk jugs, juice containers, plastic bottles, and other suitable containers to start seeds outdoors.
What Exactly Is Winter Sowing?
Winter sowing is the practice of planting seeds in containers outdoors during winter or late winter, depending on the plant and your climate.
The containers act like miniature greenhouses. They allow light to reach the seeds while helping retain moisture and providing some protection from harsh weather.
As the seasons change, the seeds experience natural temperature fluctuations. Those that require cold-moist stratification receive the conditions needed to break dormancy. When temperatures and daylight become suitable, the seeds can begin to germinate.
Winter sowing offers several benefits:
- Budget-friendly gardening: Recycled containers reduce the need to purchase seed-starting equipment.
- Less indoor mess: No need to fill your windowsills with trays of seedlings.
- Naturally acclimated plants: Seedlings growing outdoors are already exposed to outdoor conditions, although they still need protection from sudden extremes.
- A longer gardening season: You can begin preparing plants well before many outdoor garden beds are ready.
- An opportunity to grow native plants: Many native wildflowers and perennials benefit from winter conditions before germination.
Winter sowing is not suitable for every seed. Some plants need warm soil, while others require special treatment or a particular temperature range. Always check the seed packet or a reliable growing guide before planting.
Supplies You Will Need
One of the best things about winter sowing is that you probably have many of the supplies already.
Gather the following:
- Clean, translucent plastic milk jugs or similar containers
- Seed-starting mix that drains well
- Seeds suited to winter sowing
- Scissors or a utility knife
- A nail, awl, or suitable tool for making drainage holes
- Waterproof plant labels or a permanent labeling method
- Duct tape, if needed to secure the container
- Water
- A sunny or partly sunny outdoor location protected from strong winds
How to Winter Sow Seeds: Step by Step
Step 1: Choose the right seeds
Begin by selecting seeds suited to your growing region and the winter sowing method.
Many native wildflowers and perennial flowers are excellent choices. Depending on your climate and the requirements of the species, you might try:
- Black-eyed Susan
- Purple coneflower
- Wild columbine
- Milkweed species native to your region
- Penstemon
- Certain perennial salvias
Some cool-season vegetables, herbs, and annual flowers can also be started this way.
Read the seed packet carefully. Look for instructions mentioning cold stratification or outdoor fall or winter sowing. Seeds that need warm temperatures to germinate should generally be sown later, when conditions are appropriate.
Step 2: Prepare your containers
Wash your plastic containers thoroughly and rinse them well.
For a milk jug, carefully cut around the middle, leaving a small section uncut to act as a hinge. This allows you to open the container for planting and later ventilation.
Make several drainage holes in the bottom so excess water can escape. Remove the cap from a milk jug to allow air circulation and rain to enter.
Other containers can work, too, provided they allow light through, offer enough room for soil and seedlings, and have adequate drainage and ventilation.
Step 3: Add the seed-starting mix
Fill the bottom portion of the container with approximately 3 inches of seed-starting mix, or enough to provide adequate root space.
Moisten the mix thoroughly until it feels like a damp sponge. It should hold moisture without becoming waterlogged.
Avoid using dense garden soil, which can compact in a container and interfere with drainage.
Step 4: Sow your seeds
Plant the seeds according to the instructions on the packet.
Some seeds need to be covered with a thin layer of growing mix, while others require light and should remain on the surface. Very small seeds may need only gentle contact with the moist soil.
Do not plant too deeply. A seed buried too far beneath the surface may struggle to germinate.
If you are sowing several varieties, use separate containers whenever possible. This makes it easier to identify and transplant the seedlings later.
Step 5: Label everything
This step may seem unimportant when you are first planting, but it can save considerable confusion in spring!
Write the plant name and sowing date on a weather-resistant label. Place the label inside the container as well, since outdoor markers can fade.
A simple gardening notebook or spreadsheet can help you keep track of the varieties you planted and their progress.
Step 6: Close the container
Close the hinged container and secure it with duct tape if needed.
Make sure the container has sufficient ventilation. Never seal it completely airtight, and keep the milk jug cap off.
Your container should allow light to enter, rain to reach the soil, excess water to drain, and air to circulate.
Step 7: Place your containers outdoors
Set your containers outside in a location where they can experience natural temperature changes and receive rain or snow as appropriate.
A sheltered spot that receives sunlight is often suitable. Protect the containers from strong winds and animals that might knock them over.
Do not bring them indoors simply because temperatures drop. Cold exposure is part of the process for seeds that require stratification.
However, remember that the inside of a container can heat up quickly on sunny days, even when the air is cold. Monitor conditions and provide additional ventilation when needed.
Step 8: Let nature do its work
Now comes the hardest part for many gardeners: waiting!
During winter, check your containers periodically. Make sure they remain upright, that the soil has not dried out, and that excess water can drain away.
Rain and melting snow may provide much of the necessary moisture, but you may need to water during dry periods.
Avoid keeping the soil saturated. Too much moisture can encourage mold and cause seeds to rot.
As spring approaches, watch for the first signs of germination. Some seeds sprout early, while others may take considerably longer.
Step 9: Monitor and care for your seedlings
Once seedlings appear, inspect your containers regularly.
On warm, sunny days, open or ventilate them as necessary to prevent overheating. As temperatures rise, you may need to leave the containers open for longer periods or remove their covers gradually.
Protect young seedlings from severe weather and sudden temperature changes.
When the seedlings have developed true leaves and are large enough to handle, they may be ready for transplanting. Check the needs of the particular species before moving them.
Step 10: Transplant into the garden
Choose a suitable day to transplant your seedlings, taking the weather and the plant’s growing requirements into account.
Gently separate crowded seedlings, taking care to protect their roots. Plant them at the appropriate depth and spacing, then water them thoroughly.
Continue monitoring moisture while the young plants establish themselves.
Soon, those little containers that sat quietly outdoors all winter may become a garden full of flowers, foliage, and new growth!
When Is the Best Time to Start Winter Sowing?
The ideal timing depends on your climate, the type of seed, and the amount of cold exposure required.
In many colder regions, gardeners begin sowing hardy perennial seeds from late fall through winter. Cool-season vegetables may be started closer to the end of winter, while warm-season vegetables generally need warmer conditions.
Gardeners in warmer climates should be especially mindful of timing. A prolonged period of cold weather may not occur, and containers can heat up quickly in winter sunshine. In those areas, use species-appropriate instructions rather than assuming every seed will benefit from being outdoors for months.
A useful rule is to let the seed’s requirements guide your planting schedule instead of following a single calendar date.
Common Winter Sowing Mistakes to Avoid
Even though winter sowing is straightforward, a few common mistakes can reduce your success.
Using the wrong seeds. Not all plants need cold stratification. Some seeds need warmth, while others have different dormancy requirements.
Forgetting drainage holes. Containers that hold excess water can lead to rotting seeds and unhealthy seedlings.
Allowing the soil to dry out. Seeds need appropriate moisture to remain viable and, when required, complete cold stratification.
Planting seeds too deeply. Follow the recommended sowing depth for each variety.
Forgetting to label containers. A row of identical jugs can quickly become a mystery garden!
Leaving seedlings closed up during warm weather. Miniature greenhouses can overheat, so regular monitoring and ventilation are essential.
Transplanting too early. Wait until seedlings are sufficiently developed and outdoor conditions are appropriate for the species.
Why Winter Sowing Is Worth Trying
Winter sowing offers more than an economical way to start seeds. It encourages gardeners to observe the seasons, learn about the natural life cycles of plants, and work with nature rather than against it.
It can be especially rewarding when growing native flowers that support local pollinators. By selecting plants adapted to your region, you can create a garden that offers food and habitat for butterflies, bees, and other beneficial wildlife.
It is also an excellent project for families, gardening clubs, and anyone who wants to stay connected to gardening during the quieter months.
You do not need a greenhouse, an elaborate growing station, or a large gardening budget. A few recycled containers, suitable seeds, and a little patience are often enough to begin.
Final Thoughts: Let Winter Plant the Seeds of Spring
Winter may seem like a time to put gardening aside, but it can be the beginning of something beautiful.
With winter sowing, you can prepare for the growing season while the landscape rests. You can experiment with new flower varieties, grow native plants, and discover which seeds respond best to your local conditions.
Start small with a few containers and a handful of seeds. Label them carefully, check them occasionally, and give them time.
When spring arrives and the first green shoots appear, you will have a wonderful reminder that even during the coldest months, a garden’s next chapter is already beginning.
Happy winter sowing, and may your spring garden be filled with healthy seedlings and beautiful blooms!
Suggested resources for further reading
- Cornell Cooperative Extension — Winter Sowing 101
- University of Maryland Extension — Collecting & Sowing Native Plant Seed
- University of Missouri Extension — Winter Sowing Seeds
- University of Illinois Extension — How to Try Winter Sowing
These resources offer additional guidance on seed selection, cold stratification, container preparation, and seedling care.


Leave a Reply